ADFSolution

Monday, October 12, 2015

Oracle Application Adapter for SAP R/3 Installation and Configure Guide.

Hi Friends,


Today I am sharing how to install SAP Adapters.

Software       iwora11gPS3_application-adapters_win.exe 


Step 1        Go to where you have iwora11gPS3_application-adapters_win.exe  File Location and                       Run the .exe  file.


Example:  C:\Users\HPSEB\Desktop\Software\ iwora11gPS3_application-adapters_win.exe 


Click Next.


                                       Select Middleware Home.


                                                                             Click Install.


                                                                 Click  done.


                 Now I am Configure Adapter for SAP R/3.


              Now I am starting  Application Explorer and configure Third party Adpter .

1. Go to  <Middleware_Home>\Oracle_SOA1\soa\thirdparty\ApplicationAdapters\tools\iwae\bin

2.   Execute ae.bat


Now Configure.


Click Configure and select New.

Enter a name for the new configuration, for example, HPSEB_SAP and then click OK.


                                                     Select JCA and click Ok.


                                    Now, your Application Explorer will look as below:


Connect the  HPSEB_SAP.


                         Configuring Settings for the J2CA Connector Application.


1. Goto directory:

<ORACLE_HOME>\Oracle_SOA1\soa\thirdparty\ApplicationAdapters\iwafjca.rar\META-INF\ ra.xml

2. Open the ra.xml file in an editor.

3. Enter a value for the IWayHome property.

This is the folder where the adapters are installed. For example:
                <config-property>
                                <config-property-name>IWayHome</config-property-name>
                                <config-property-type>java.lang.String</config-property-type>
                                <config-property-value>        
                             C:\Oracle\Middleware\Oracle_SOA1\soa\thirdparty\ApplicationAdapters
                          </config-property-value>
                </config-property>

4. Enter a value for the IWayConfig property.
This is the value that you specified when you created a new J2CA configuration
using Application Explorer. For example:
                <config-property>
                                <config-property-name>IWayConfig</config-property-name>
                                <config-property-type>java.lang.String</config-property-type>
                                <config-property-value>HPSEB_SAP</config-property-value>
                </config-property>
5. Save  file ra.xml .


Now I am Deploying the J2CA Connector Application Using the Oracle WebLogic Server Administration Console:
1.       Start the Oracle WebLogic Server for the Oracle WebLogic Server domain.
Path:   C:\Oracle\Middleware\user_projects\domains\hpseb_domain\bin\startWebLogic.cmd
               Open the Oracle WebLogic Server Administration Console in a Web browser using below


             The Oracle WebLogic Server Administration Console page is displayed, as given below

             Enter Username weblogic
             Enter Password welcome1


3.     Log in to the Oracle WebLogic Server Administrative Console using an account having administrator privileges.


4:      Open console and go to left side click Deployments  and select the iwafjca:


5. Click Install.

6. Browse to following directory:
<ORACLE_HOME>\Oracle_SOA1\soa\thirdparty\ApplicationAdapters\iwafjca.rar

7. Select iwafjca.rar option given blow.


8. Click Next.

9. and click Next.


10. Select soa_server1 and click Next.

11. Click Next again leaving the default values.

12  Click Finish.


13. Settings page for the J2CA (iwafjca) Connector Application is displayed, as shown below.
       Click Save.


Deploying the J2CA Installation Verification Program (IVP) Using the Oracle WebLogic Server Administration Console
1. Go to Deployments on Oracle Weblogic Server Administration Console and click Install.

2. Browse to following directory:
<ORACLE_HOME>\Oracle_SOA1\soa\thirdparty\ApplicationAdapters\ iwafjca.war

3. Select iwafjca.war option and click Next.


4. Leave the default install this deployment as an application and click next.

5. Enter In the Name of the field  iwafjcatest and Click next.

6. Leave the configuration setting and click Finish.

7. Settings page for the J2CA Installation Verification Program (IVP) is displayed, as shown below.   
Click Save.


Wednesday, September 2, 2015

HR Schema Question and Answer in Oracle Database 11g part 2

Hi Friends Today i am sharing  Oracle 11g Database Some Question and Answer.


16   Display the first name and join date of the employees who joined between 2002 and 2005.


SELECT FIRST_NAME, HIRE_DATE FROM EMPLOYEES
WHERE TO_CHAR(HIRE_DATE, 'YYYY') BETWEEN 2002 AND 2005 ORDER BY HIRE_DATE.


17  Display job title and average salary of employees.

SELECT JOB_TITLE, AVG(SALARY) FROM EMPLOYEES

NATURAL JOIN JOBS GROUP BY JOB_TITLE.


18  Display job title, employee name, and the difference between maximum salary for the job and salary of the employee.

SELECT JOB_TITLE, FIRST_NAME, MAX_SALARY SALARY

DIFFERENCE FROM EMPLOYEES NATURAL JOIN JOBS.

19   Display details of jobs that were done by any employee who is currently drawing more than 13000 of salary.


SELECT JH.*
FROM JOB_HISTORY JH JOIN EMPLOYEES E ON (JH.EMPLOYEE_ID = E.EMPLOYEE_ID)

WHERE SALARY > 13000.


20   Display country name, city, and department name.


SELECT COUNTRY_NAME, CITY, DEPARTMENT_NAME
FROM COUNTRIES JOIN LOCATIONS USING (COUNTRY_ID)

JOIN DEPARTMENTS USING (LOCATION_ID)

21  Display department name and manager first name.

SELECT DEPARTMENT_NAME, FIRST_NAME FROM DEPARTMENTS D JOIN EMPLOYEES E ON (D.MANAGER_ID=E.EMPLOYEE_ID)

22   Insert a row into departments table with manager ID 130 and location ID in any location ID for city Delhi.

INSERT INTO DEPARTMENTS (160,'SPORTS',130,1300)


23   Change job ID of employee 110 to IT_PROG if the employee belongs to department 10 and the existing job ID does not start with IT.

UPDATE EMPLOYEES SET JOB_ID= 'IT_PROG'

WHERE EMPLOYEE_ID=110 AND DEPARTMENT_ID=10 AND NOT JOB_ID LIKE 'IT%'

How to Change Weblogic Server Log File and Location

Hi Friends Today i am sharing How to Change Weblogic Server Log File and Location.

Step 1   You start Weblogic Server From server location 

C:\Oracle\Middleware\user_projects\domains\hpseb_domain\bin\startWebLogic.cmd

Step 2  Login Console.

 http://localhost:7101/console/login/LoginForm.jsp

Step 3 Enter Username       weblogic.
           Enter password        welcome1.
           Click Login.      
           Now your console is login.

Step 4  Go to In the left pane of the Console Window Click.


Step 5 In the Servers table, click the name of the server instance whose logging you want to configure.


Step 6 Select Logging and click it.


Step 7 In the Log File Name field, enter a path where you want to store the log File and filename for the server log. 

 my path is              C:\Test Log File
 my file name is      DefaultServer.log


Step 8    Click Save Button  and restart server, some times you have need to restart server.


                                                   Thanks 

Friday, May 1, 2015

HR Schema Question and Answer in Oracle Database 11g.

Hi Friends Today i am share Oracle 11g Database Some Qusetion and Answer.


  1. Display details of jobs where the minimum salary is greater than 10000.


        SELECT * FROM JOBS WHERE MIN_SALARY > 10000


2  . Display the first name and join date of the employees who joined between 2002 and 2005.


        SELECT FIRST_NAME, HIRE_DATE FROM EMPLOYEES

        WHERE TO_CHAR(HIRE_DATE, 'YYYY') BETWEEN 2002 AND 2005 ORDER BY HIRE_DATE


3. Display details of employee with ID 150 or 160.


       SELECT * FROM EMPLOYEES WHERE EMPLOYEE_ID in (150,160)


4. Display first name and join date of the employees who is either IT Programmer or Sales Man.


      SELECT FIRST_NAME, HIRE_DATE

      FROM EMPLOYEES WHERE JOB_ID IN ('IT_PROG', 'SA_MAN')


5. Display employees who joined after 1st January 2008.


SELECT * FROM EMPLOYEES where hire_date > '01jan2008'


6. Display first name, salary, commission pct, and hire date for employees with salary less than 10000.


SELECT FIRST_NAME, SALARY, COMMISSION_PCT, HIRE_DATE FROM EMPLOYEES WHERE SALARY < 10000


7. Display job Title, the difference between minimum and maximum salaries for jobs with max salary in the range 10000 to 20000.


SELECT JOB_TITLE, MAX_SALARYMIN_

SALARY DIFFERENCE FROM JOBS WHERE MAX_SALARY BETWEEN 10000 AND 20000


8. Display details of jobs in the descending order of the title.


SELECT * FROM JOBS ORDER BY JOB_TITLE


9. Display employees who joined in the month of May.


SELECT * FROM EMPLOYEES WHERE TO_CHAR(HIRE_DATE, 'MON')= 'MAY'


10 Display employees where the first name or last name starts with S.


SELECT FIRST_NAME, LAST_NAME FROM EMPLOYEES WHERE FIRST_NAME LIKE 'S%' OR LAST_NAME LIKE 'S%'


11. Display details of jobs in the descending order of the title.


SELECT * FROM JOBS ORDER BY JOB_TITLE


12. Display first name and experience of the employees.


SELECT FIRST_NAME, HIRE_DATE, FLOOR((SYSDATEHIRE_

DATE)/365)FROM EMPLOYEES

13  Display details of the employees where commission percentage is null and salary in the range 9000 to 10000 and department is 30.


SELECT * FROM EMPLOYEES WHERE COMMISSION_PCT IS NULL AND SALARY BETWEEN 9000 AND 10000 AND DEPARTMENT_ID=30


14 Display first name and experience of the employees.

SELECT FIRST_NAME, HIRE_DATE, FLOOR((SYSDATEHIRE_

DATE)/365)FROM EMPLOYEES

15. Display the length of first name for employees where last name contain character ‘b’ after 3rd position.


SELECT FIRST_NAME, LAST_NAME FROM EMPLOYEES WHERE INSTR(LAST_NAME,'B') > 3


SQL SERVER – 2008 R2 – Step By Step Installation Guide With Images

installed  SQL SERVER – 2008 R2 on Window / Window Server 2008.

Step 1  Install IIS 7 see previous blog.

 you Download   SQL SERVER 2008 R2.

Step 2 Go to SQL Server and right click on Setup.


Step 2  Select Planning and check security.


Step 3  View Details and click ok.

Step 4 Select Installation and click new Installation.


Click Next.


Select Check Box and click Next.


Click Install.


Click Next.


Click Next.


Click Next.


Select check Box and click Next.


Click Next.


Enter Instance Id and click Next.


Click Next.


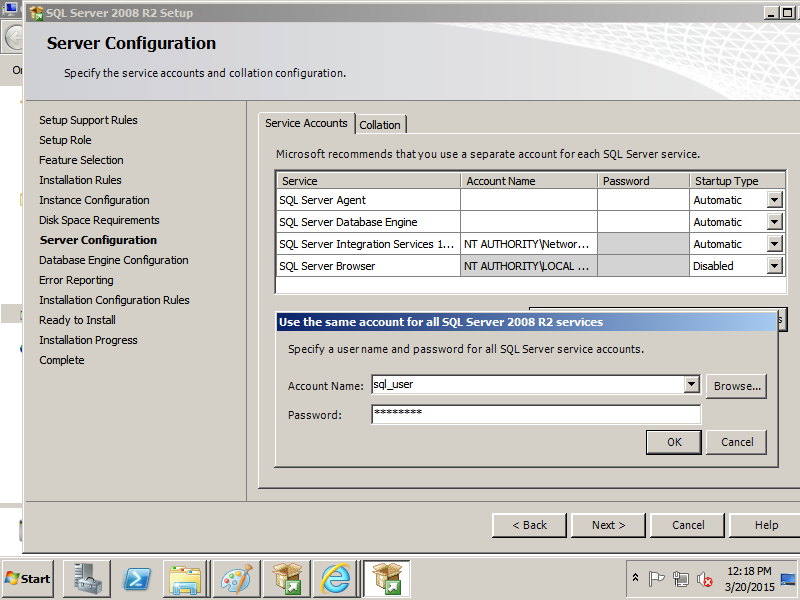
Enter account name and password  click ok then click Next.


Click use the same account for all SQL Server services and click Next.


Click Next.


Click Next.


Click Next.


Click Install.


Click close.


Go to window Firewall with advanced and select inbound Rules.


Port 1433


Select Domain  and Public.


Enter User         sa 
                             Enter Password               Welcome1  
click connect.
if you want to connect ip then local ip 127.0.0.1


your SQl server is connect. 


If you used SQL Server other Machine the 
Go to  SQL server configuration manager
 and click Protocols and Enter IP Address your System
click Apply and ok .

THANKS.